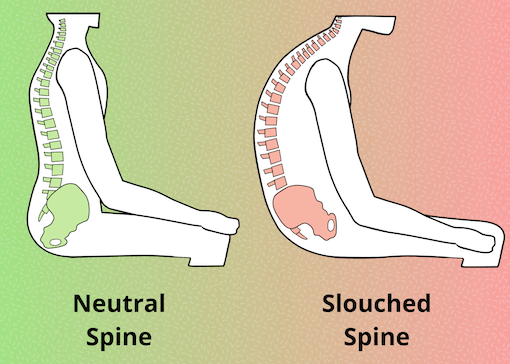
Picture stretching an elastic spring. Some amount of pulling and recoiling isn’t going to change it much. But if you keep it stretched to its maximum length for a long time, you know it’ll lose its ability to bounce back. Similarly, our spine has its own happy place, which is largely straight with some natural curves, also known as a neutral spine. Our amazing spine enables us to bend, stretch, stand, move and so on. But if we force it into a C-shaped curve while slouching on a couch with a laptop all day, it’s natural shape would eventually deteriorate.
This intuitive understanding has often given me the nudge I need to take action and improve my posture. However, putting it into practice isn’t always that easy. But my personal experience of years dealing with back and neck issues under the guidance of my amazing physical therapist has taught me some easy ways to quickly transform my posture from sitting on the bed with a laptop (like above) to a significantly better state, using things that are readily available. This post isn’t meant to be a full fledged ergonomic workstation tutorial. Here I’m sharing some minimal and inexpensive solutions along with the reasoning behind it to make it more memorable and customizable to your needs.
The timing to take action couldn’t be better! A large number of us are working from home during this pandemic, likely without a good workstation. It’s a great time to experiment in the comfort and privacy of your home. I guarantee that spending a few minutes to make small changes is going to be absolutely worth it. After all, we’re likely spending over 1/3rd of our lives working at our desks! Doesn’t this deserve our time?
Picture stretching an elastic spring. Some amount of pulling and recoiling isn’t going to change it much. But if you keep it stretched to its maximum length for a long time, you know it’ll lose its ability to bounce back. Similarly, our spine has its own happy place, which is largely straight with some natural curves, also known as a neutral spine. Our amazing spine enables us to bend, stretch, stand, move and so on. But if we force it into a C-shaped curve while slouching on a couch with a laptop all day, it’s natural shape would eventually deteriorate.

This intuitive understanding has often given me the nudge I need to take action and improve my posture. However, putting it into practice isn’t always that easy. But my personal experience of years dealing with back and neck issues under the guidance of my amazing physical therapist has taught me some easy ways to quickly transform my posture from sitting on the bed with a laptop (like above) to a significantly better state, using things that are readily available. This post isn’t meant to be a full fledged ergonomic workstation tutorial. Here I’m sharing some minimal and inexpensive solutions along with the reasoning behind it to make it more memorable and customizable to your needs.
The timing to take action couldn’t be better! A large number of us are working from home during this pandemic, likely without a good workstation. It’s a great time to experiment in the comfort and privacy of your home. I guarantee that spending a few minutes to make small changes is going to be absolutely worth it. After all, we’re likely spending over 1/3rd of our lives working at our desks! Doesn’t this deserve our time?
Only got 30 seconds?
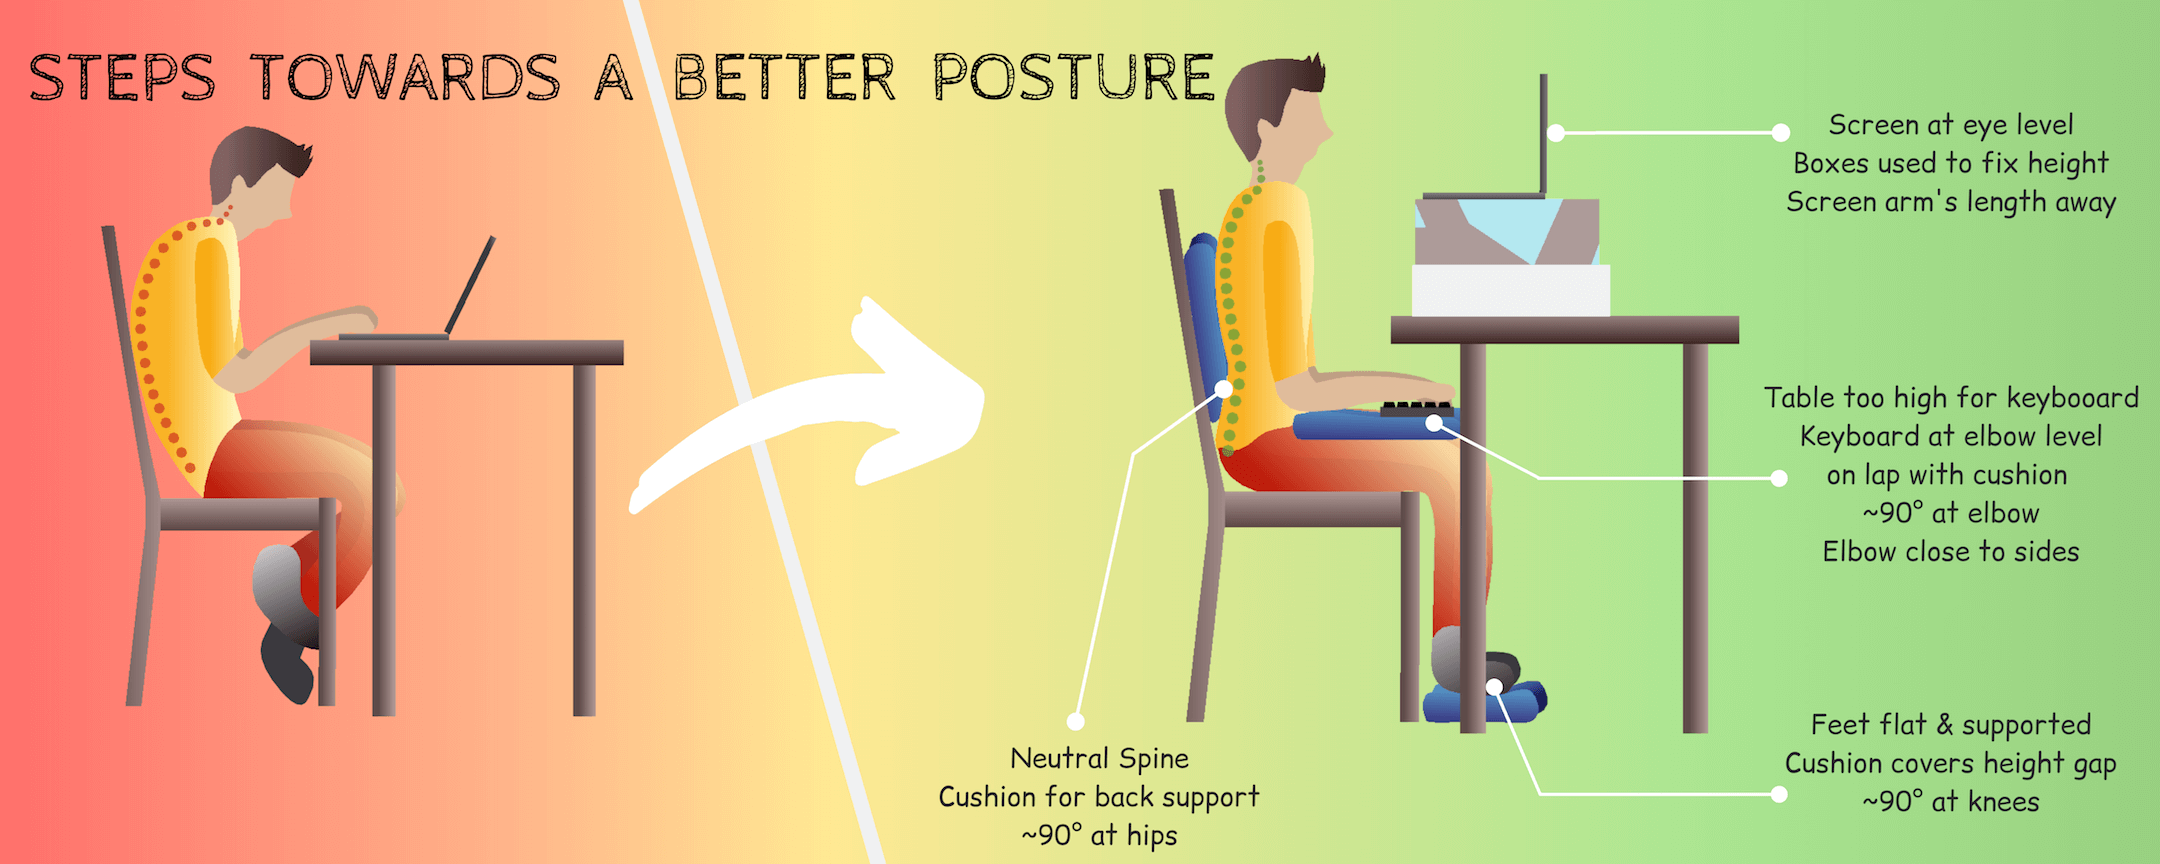
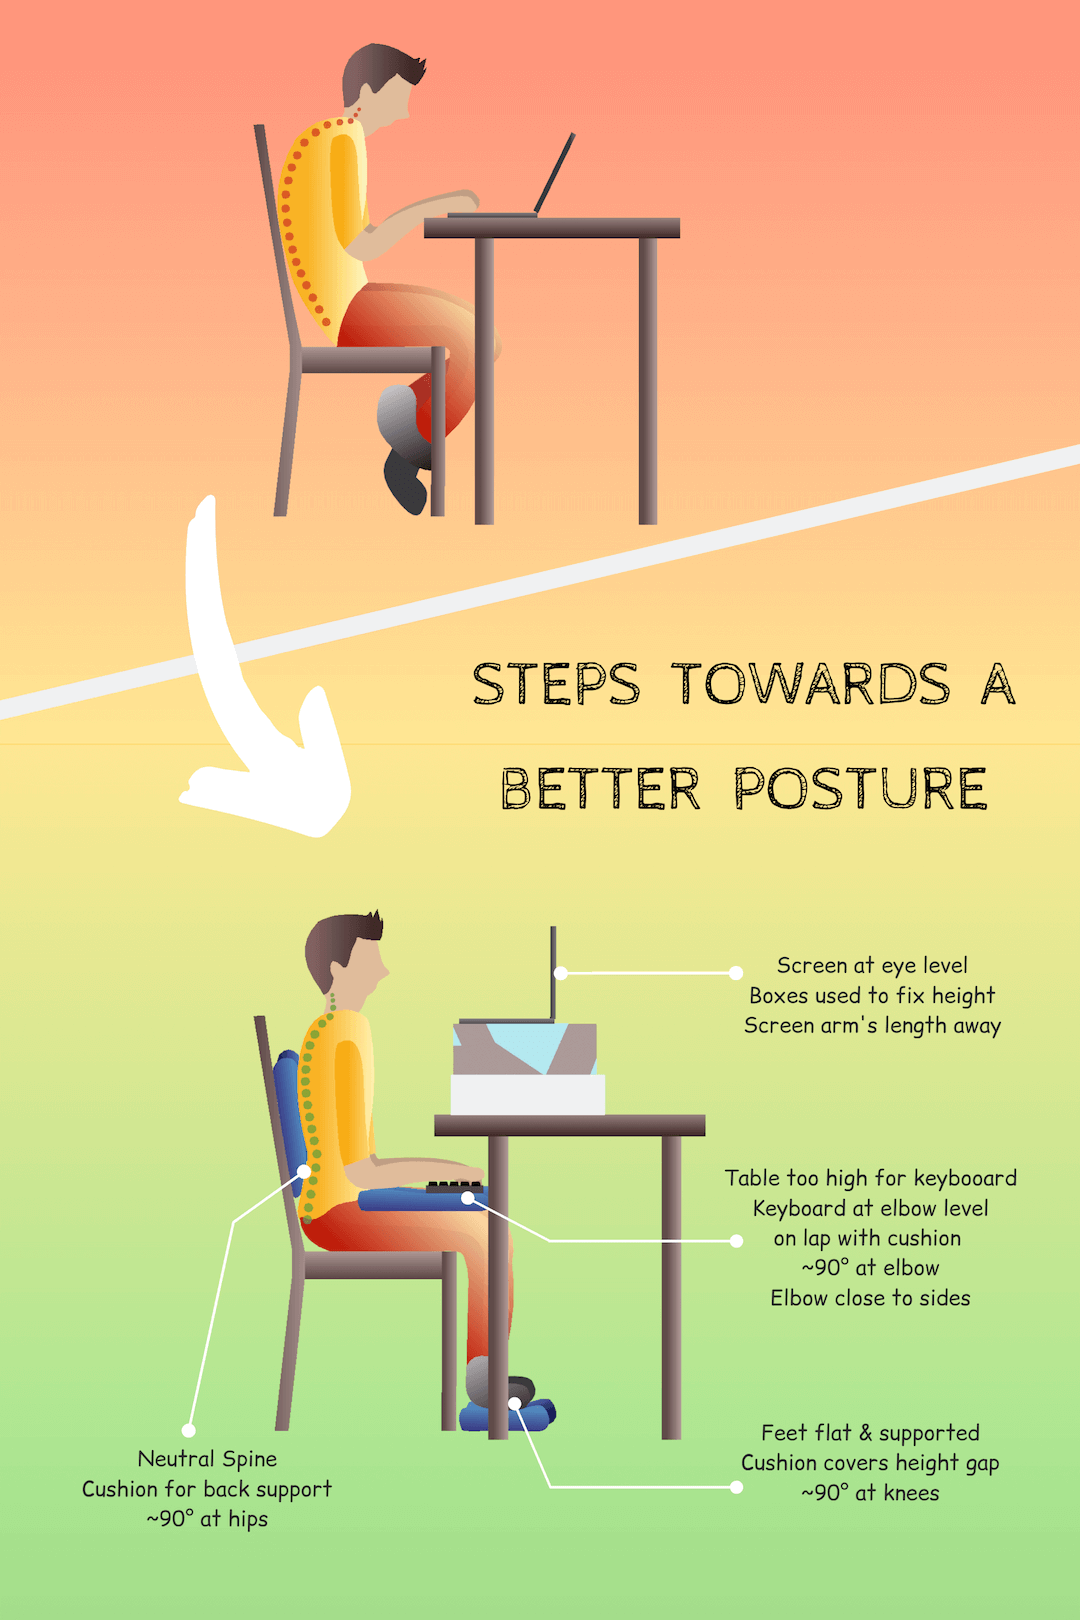
Life is busy, totally understandable! This post is written as a detailed guide that you can refer back to. But you can also quickly capture the key takeaways by starting off with this infographic and glancing through the titles and images in the rest of this post. Implementing these steps isn’t rocket science. But working with what you have to get an optimal setup and gradually getting used to it to develop a better posture takes time and attention to details. Keep reading further if you’re all in.
What you’ll need
This post assumes that you’ll be using a seat of some kind (office chair, dining chair, sofa) and a basic table or stand to place your screen. Both the table and the seat are presumably not height adjustable i.e. at a fixed height. But the same principles apply even with a more equipped workstation.
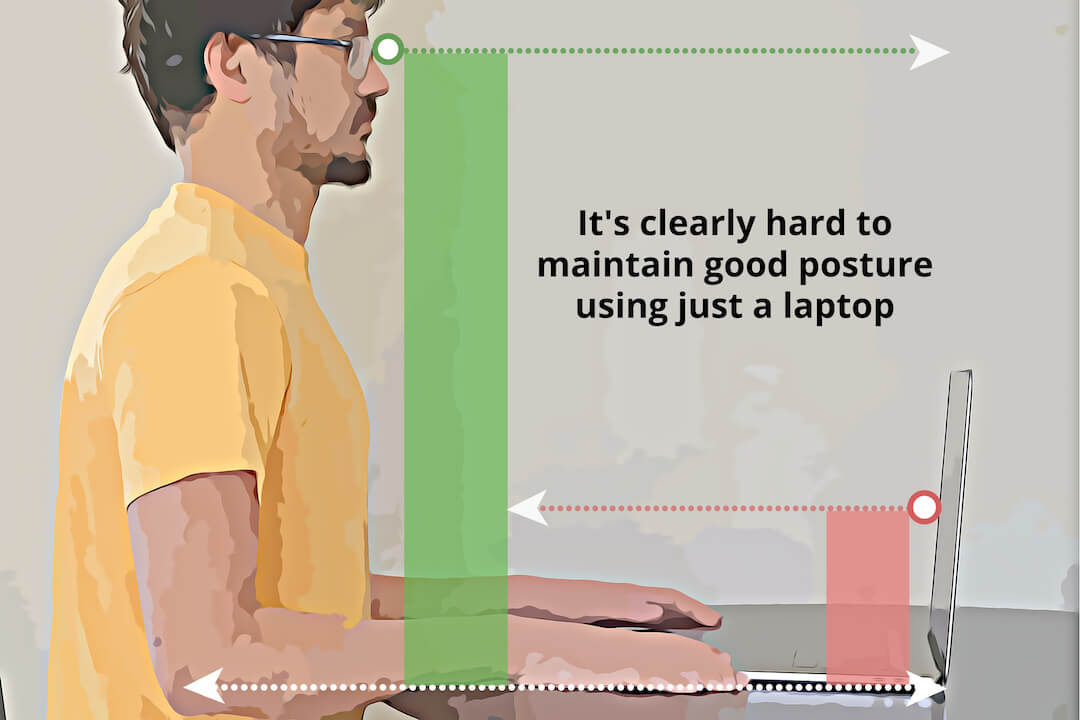
You won’t need much else if your screen is a monitor with a keyboard/mouse setup. However, things get trickier with a laptop. If you sit straight on a chair with your arms on your sides, the distance between your eyes and elbows (1-3 feet) should roughly be the distance between the center of your screen and your keyboard (3-6 inches for a laptop). This is clearly not achievable with just a laptop. So you’ll need either an external keyboard/mouse or a monitor. Lastly you’ll need some cushions, boxes or other similar items for support and height.
Key Aspects for a Good Posture
Back Support
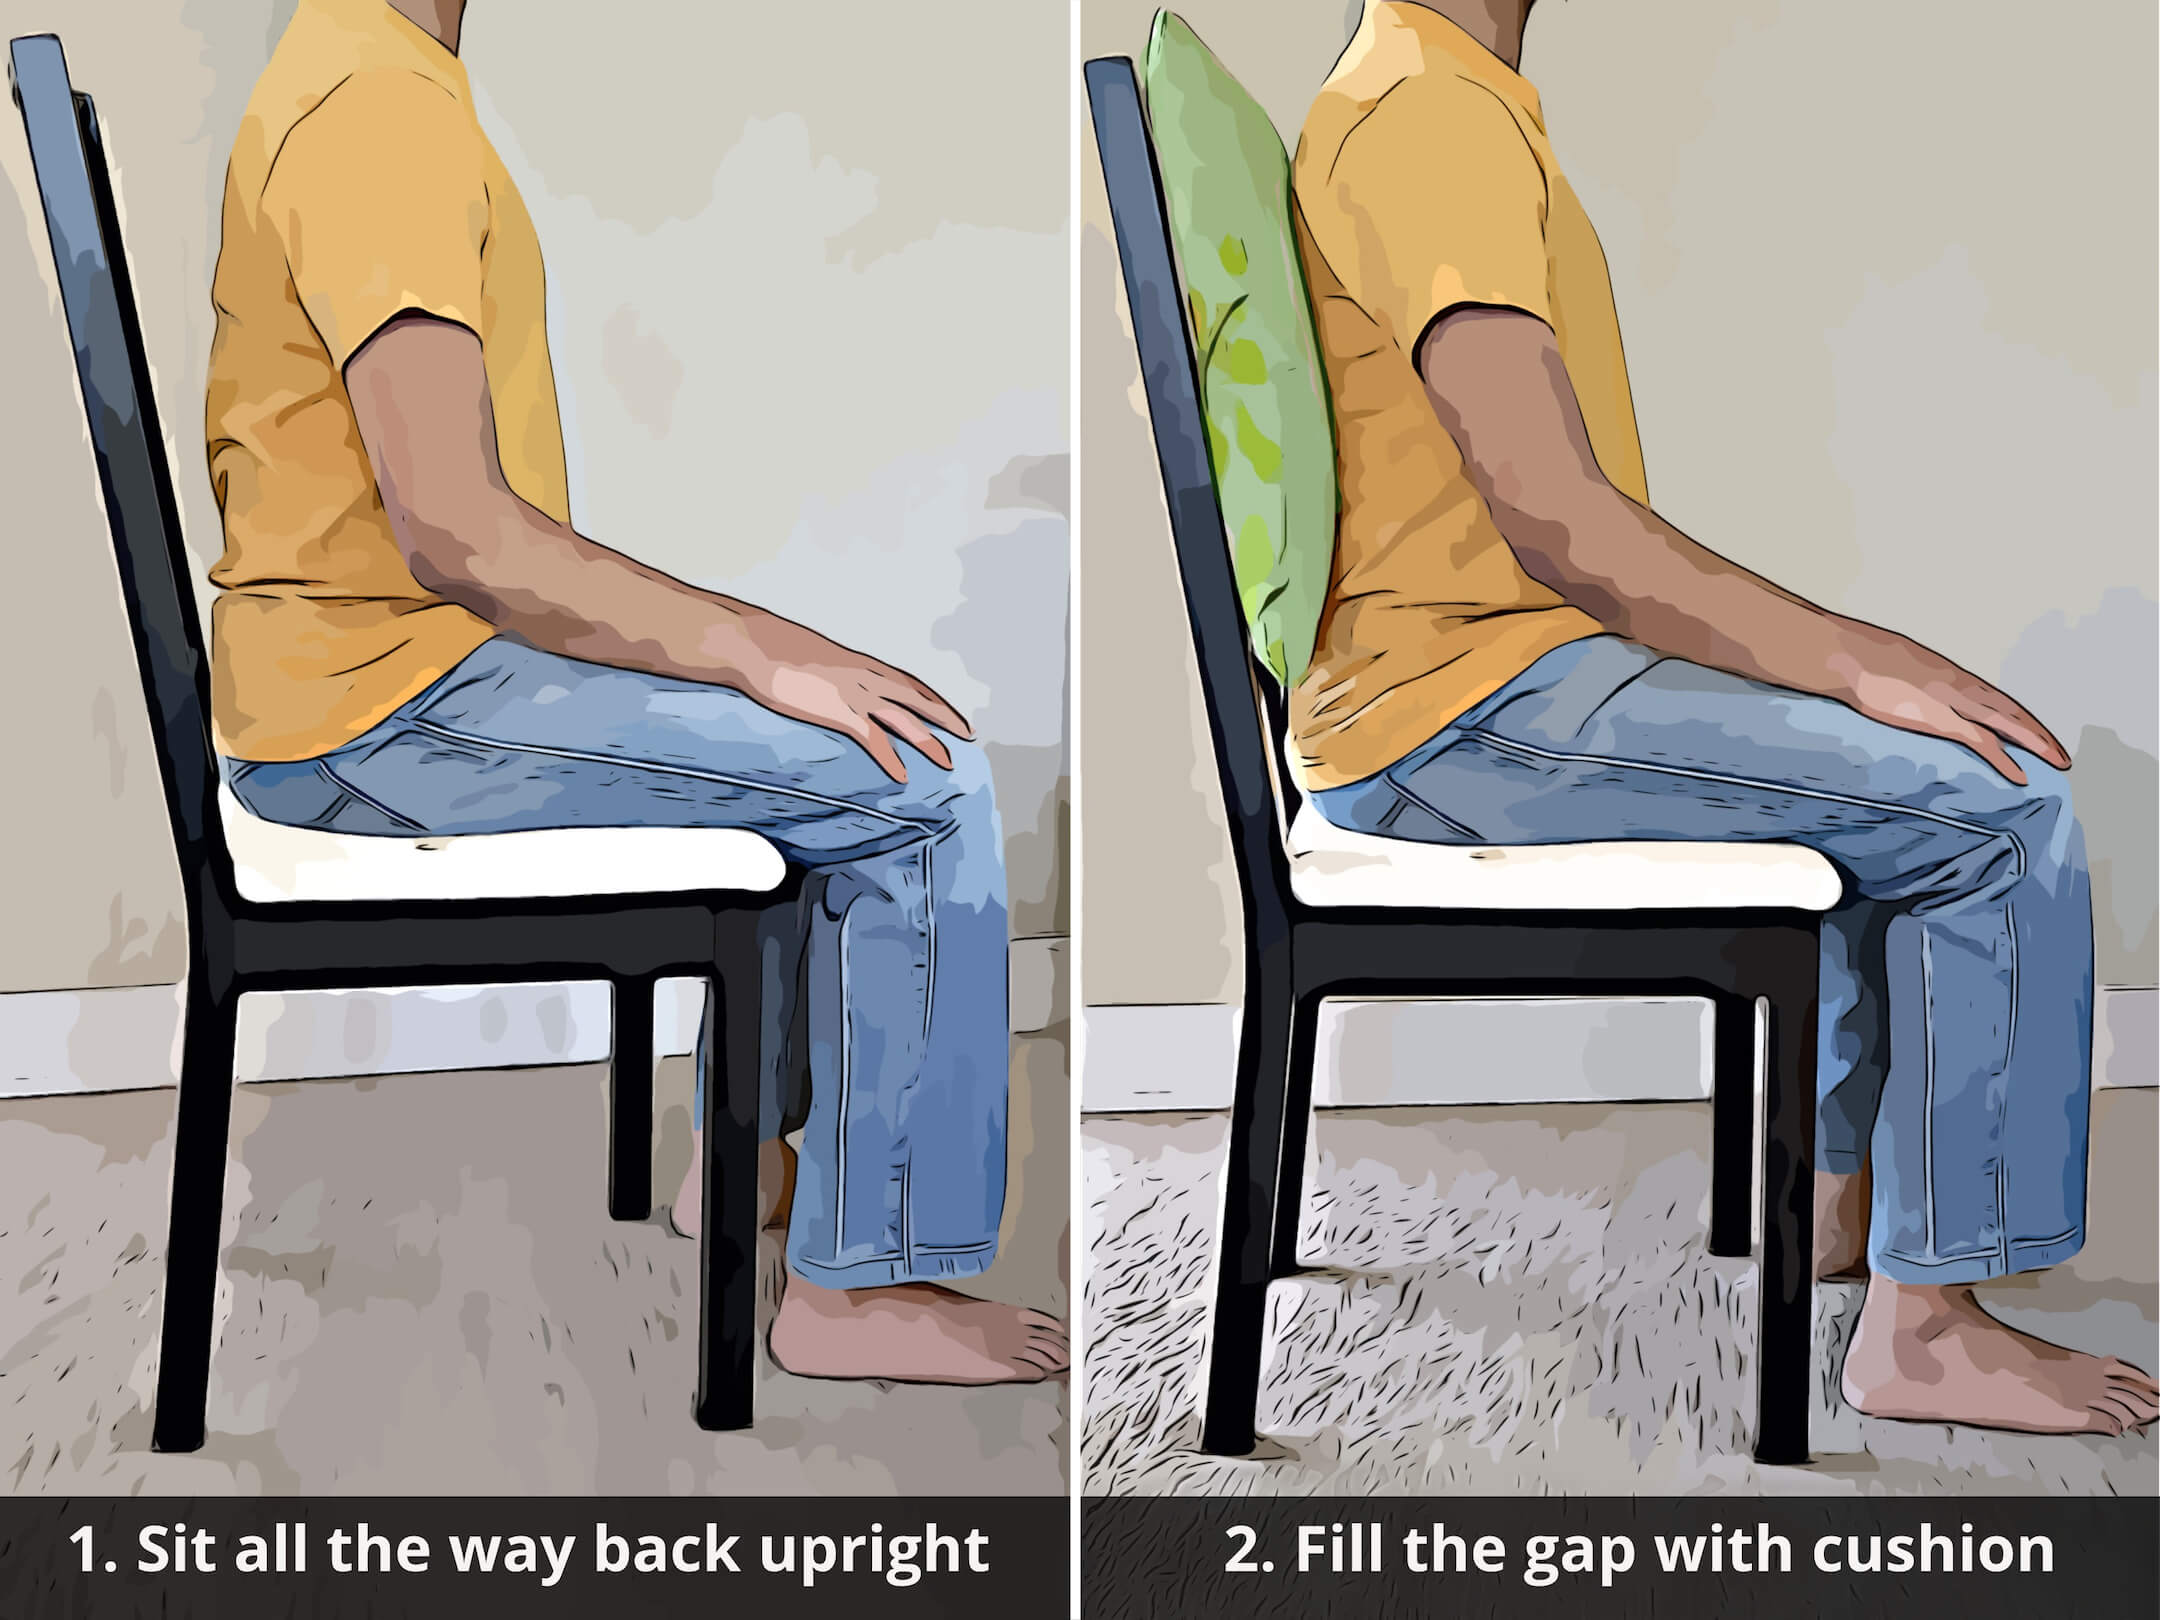
Our postural muscles are often overworked with us sitting all day. So they would surely appreciate a little help from a supportive chair. If you were sitting straight on a stool, an ideal backrest for it would enable you to comfortably stay in this position by providing support along the natural curves of your neutral spine. Your spine would make close to a right angle (90° to 110°) with your thighs and have good lower back support.
It’s possible to ‘fix’ most chairs that have a back (even if not ideal) and a seat base that is supportive (unlike a soft sofa that sags down). A simple way is to sit as far back as you can keeping your knees off the edge of the seat and your back in neutral position. Then fill in the gap between your back and the chair’s backrest with support that is firm but comfortable using pillows, cushions, towels, etc. You could even stuff a combination of these inside a pillow cover to create a single unit. A hard seat base can be fixed with a little cushion but a soft non-supportive seat base would be hard to fix. You might have to experiment a bit with whatever you have and see what works best.
You don’t have to start off with a perfectly upright position. It’s okay if you are initially more comfortable with the backrest a little reclined (around 90°-110°) by setting up the support accordingly. You’ll get more comfortable sitting in a better posture with time. However, it’s not recommended to lean forward as this can lead to a cascade of problems.
Foot Support
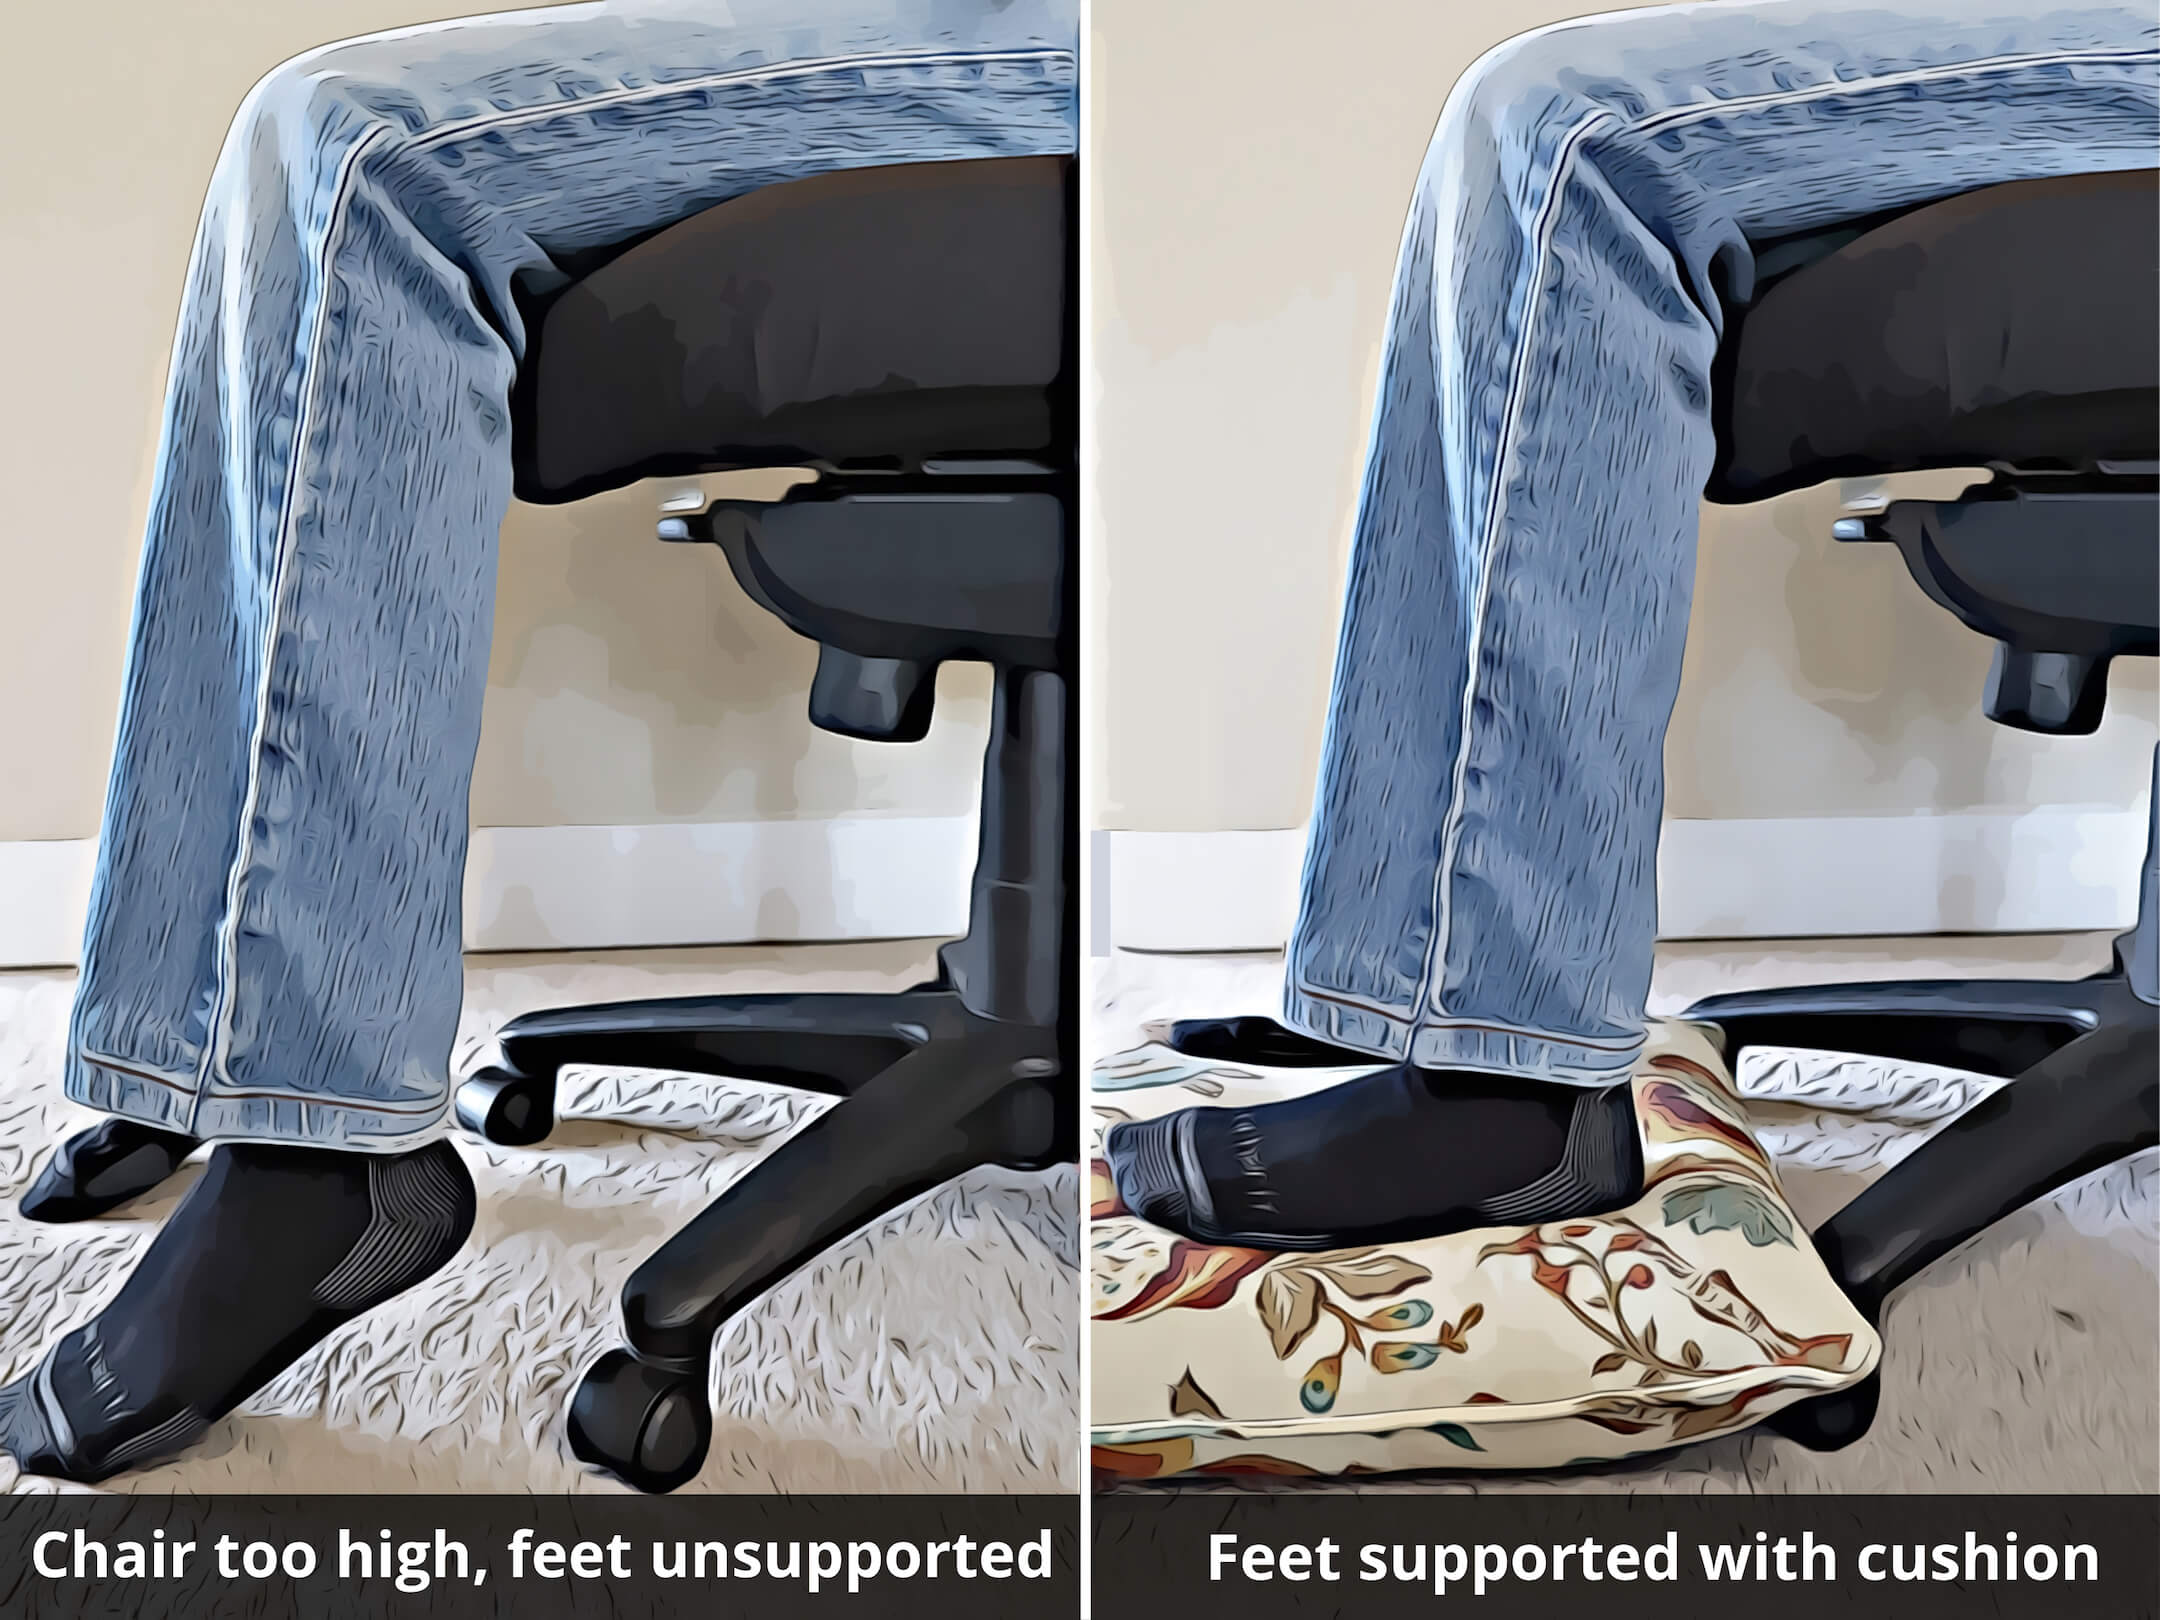
Getting proper support for your feet is critical to a good sitting posture but it’s often overlooked. If your legs are hanging off a high chair, the weight of your legs will pull your back. If the seat is too low for your height, your legs will be pushed upwards making your hips tight. Either way, it will lead to a chain reaction of muscle tightness in your lower back, hips and legs. To relieve the pressure off your back, your feet should be flat on the ground or any other support, with roughly a right angle (around 90°-110°) forming between your upper and lower legs.
If the chairs you have are not height adjustable, then preferably pick one whose height is close to or greater than the distance between your knee and foot. If the chair is too tall, you can easily cover the height difference with some support like a pillow under your feet. If it’s a little short, then add a firm cushion to your seat to effectively increase the height of your seat. Avoid picking a seat that is way too short for you.
Screen Position
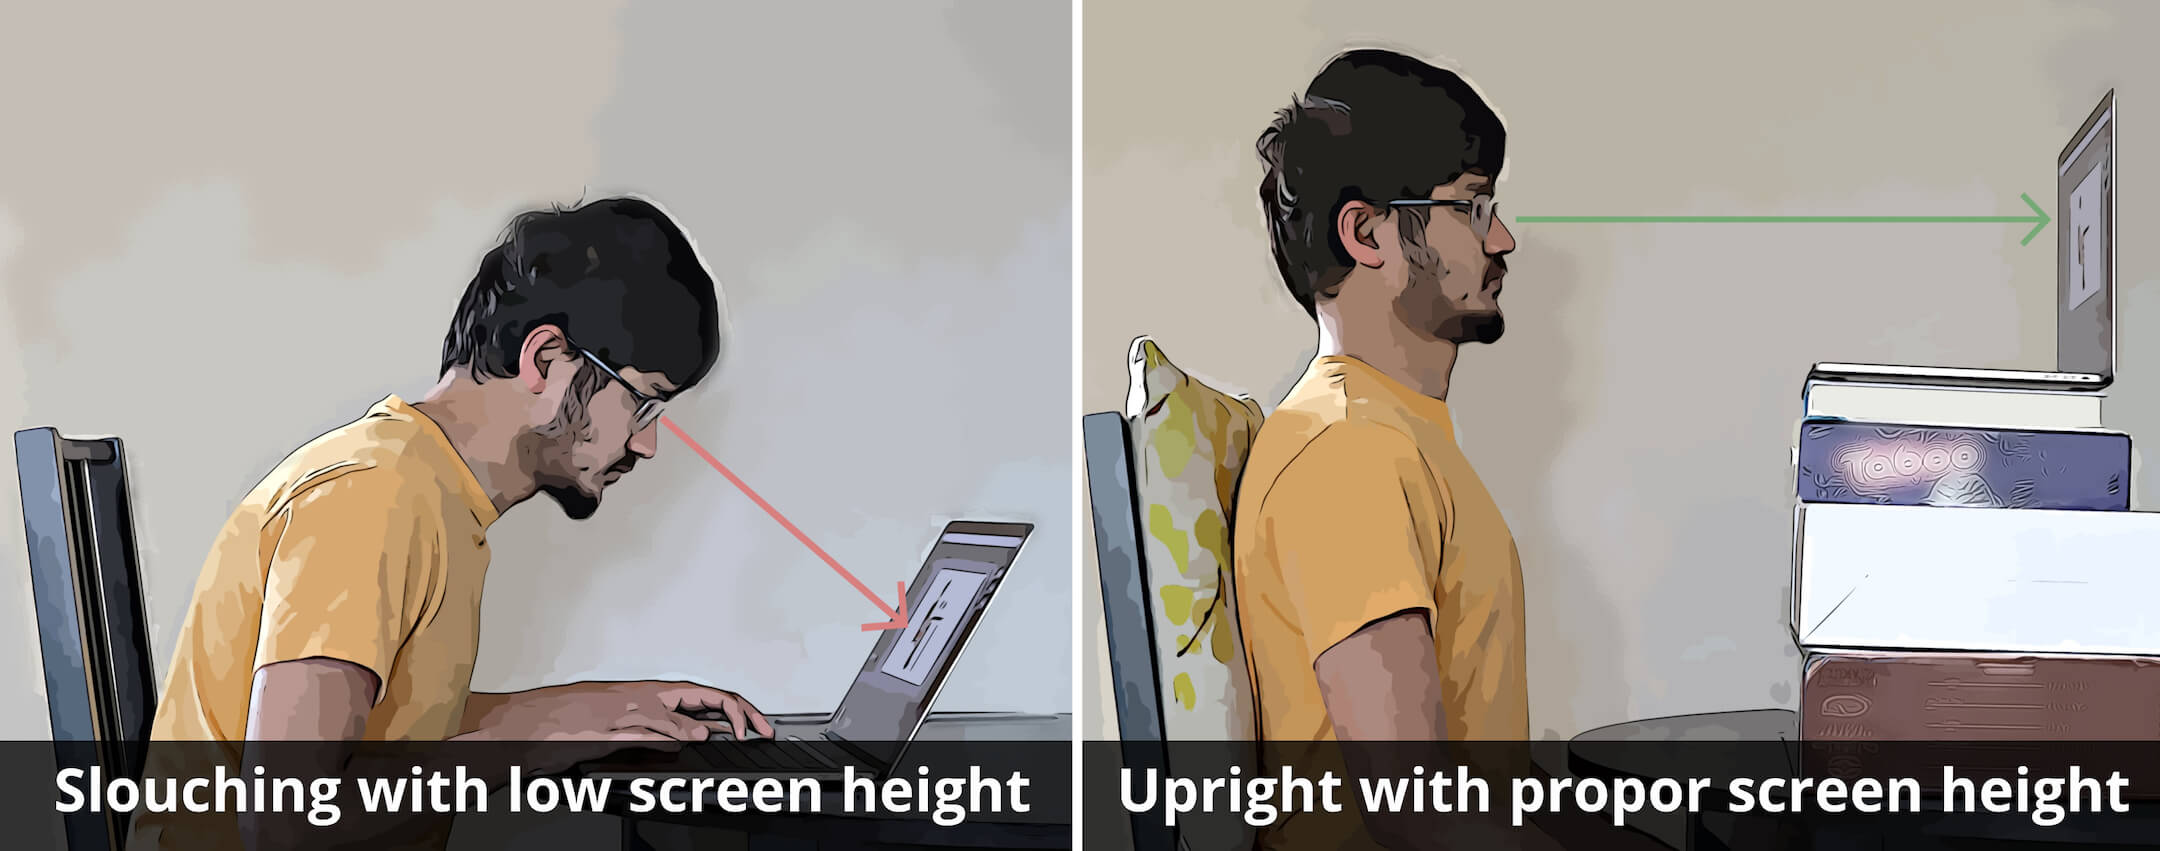
You should roughly see the center of your screen when looking straight ahead while sitting comfortably upright in your seat. Place your screen (laptop or monitor) on your table and increase its height to eye level. You can do this using books, boxes, containers etc. or get creative with a combination of different items to get the desired height. You’ll be surprised how high your screen has to go when you actually sit up straight, even while using a monitor. But again, this will take time and some getting used to. Start slow and increase the height gradually as your body adjusts to a more upright posture. Also make sure your screen is placed roughly at an arm’s distance. Any further and it leads to a tendency to lean forward to be able to read clearly. Your laptop can be even closer as it might be harder to read from a smaller screen.
Keyboard/Mouse Position
A comfortable keyboard position is critical to keeping your neck, shoulders, arms and upper back happy. If the keyboard is too high, then there’s a tendency to shrug the shoulders to lift the arms up, causing a lot of tension in the upper body. If it’s too far away, then it causes the arms to reach forward which will eventually pull the upper body into the undesirable C-shaped curve. This can also occur when the table’s drawers or the chair’s armrests get in the way of pulling the chair close enough to the table, forcing the arms to extend to reach the keyboard. Another issue is placing the keyboard on a sharp edged table such that the delicate nerves in the wrists and palms get pinched against the edges. These issues apply to mouse position as well.
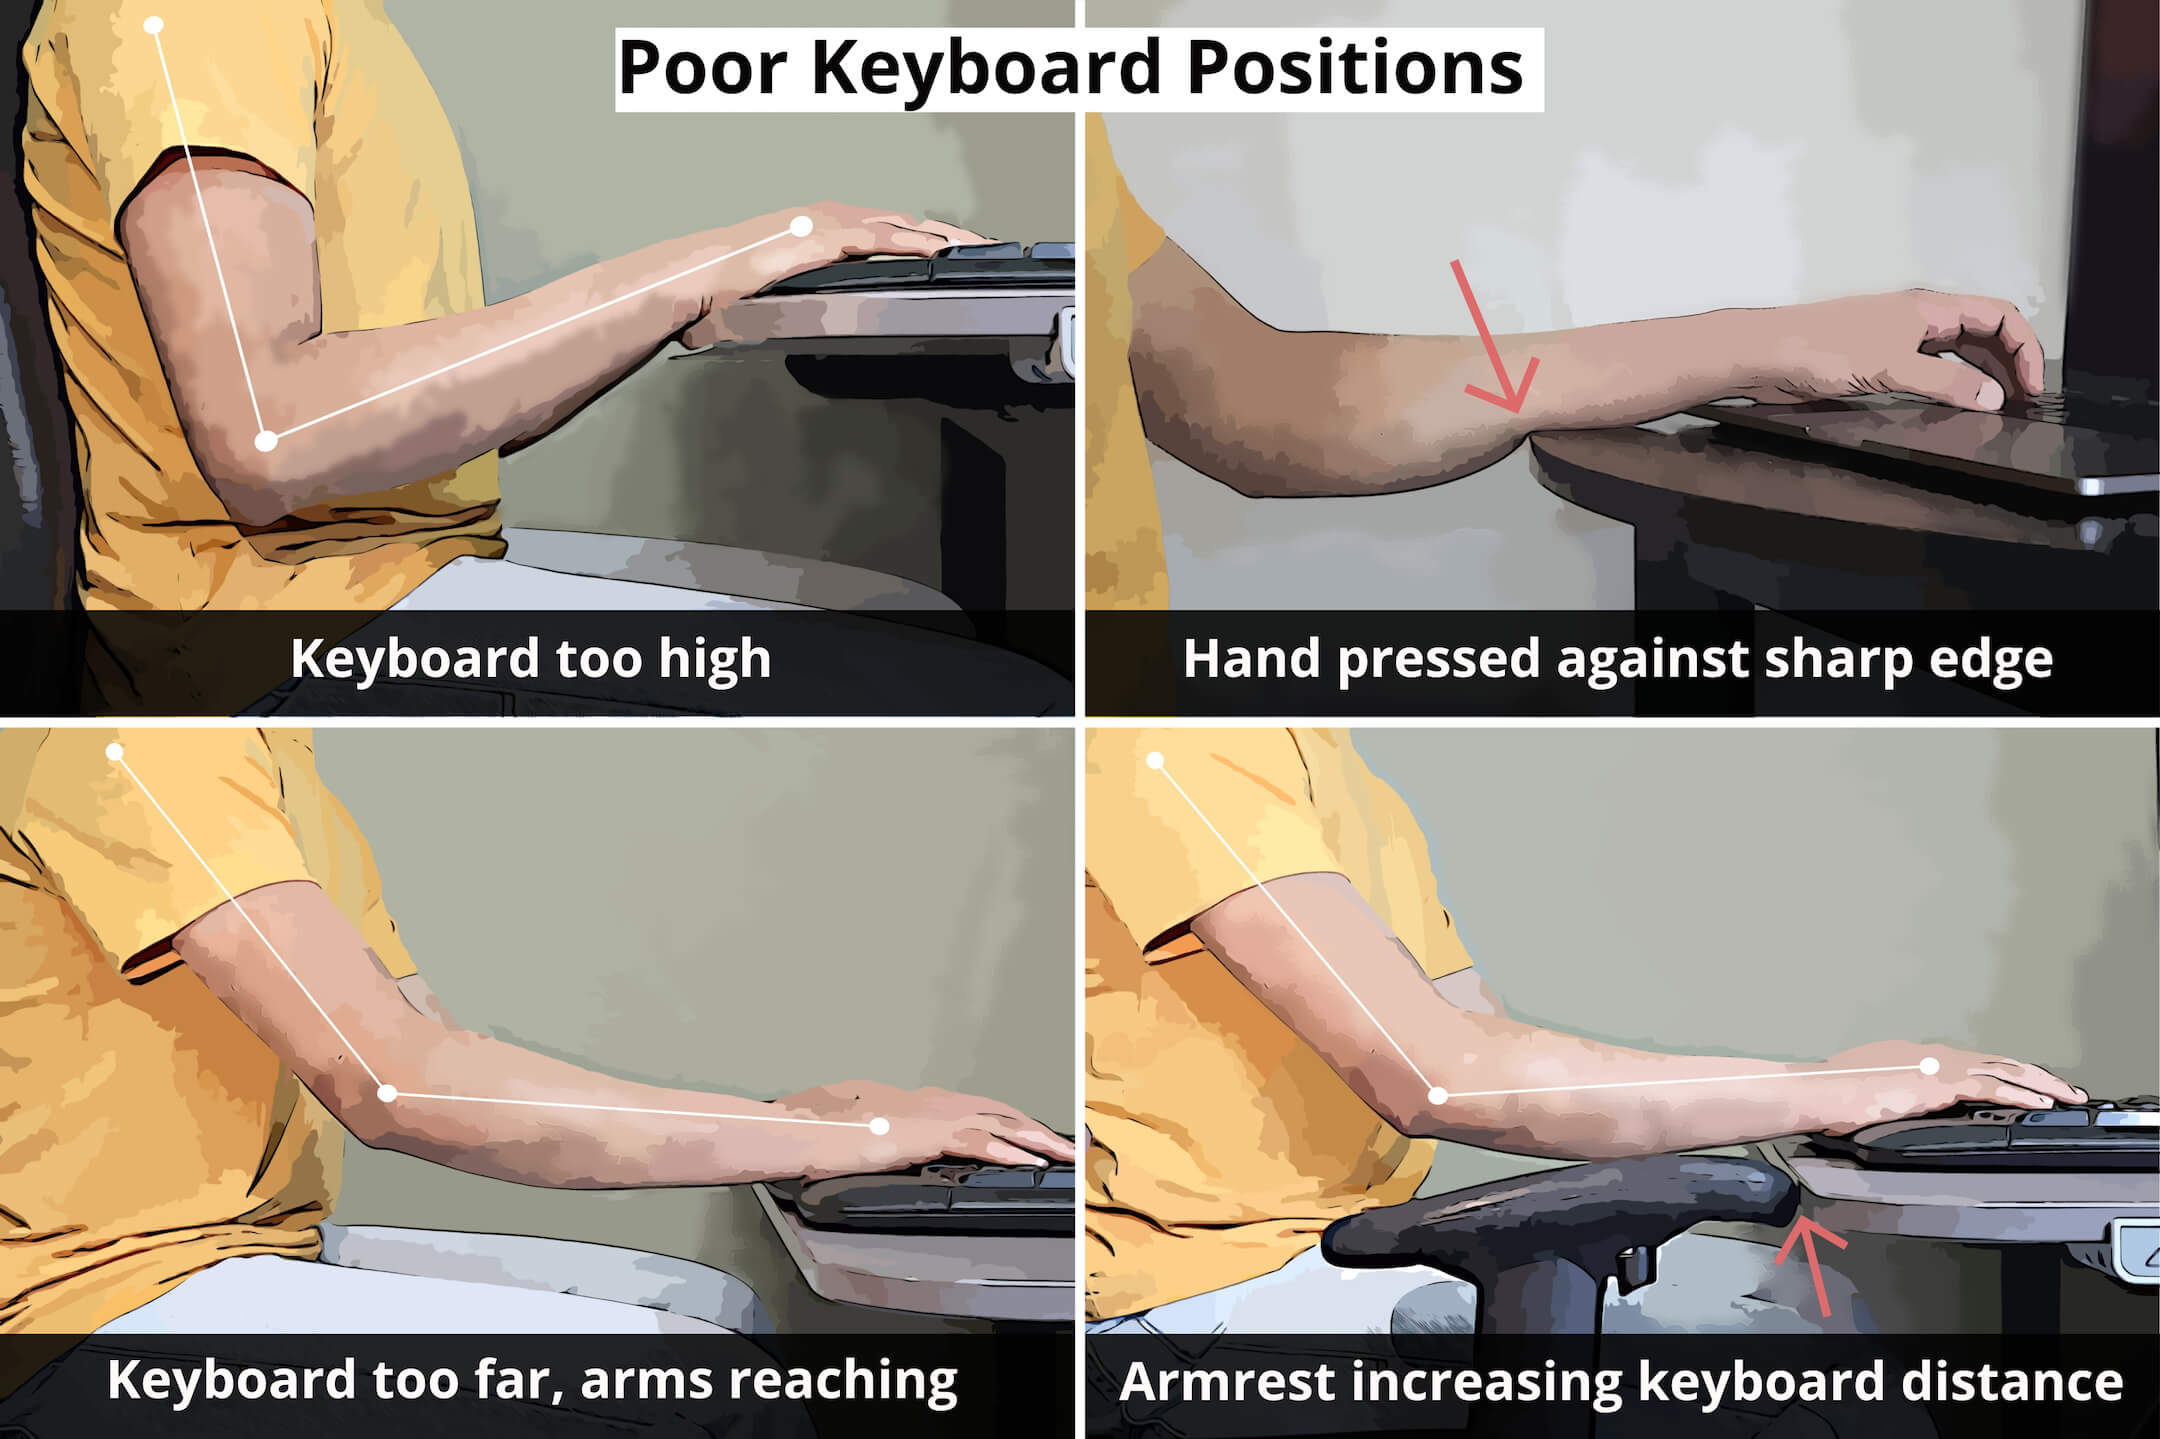
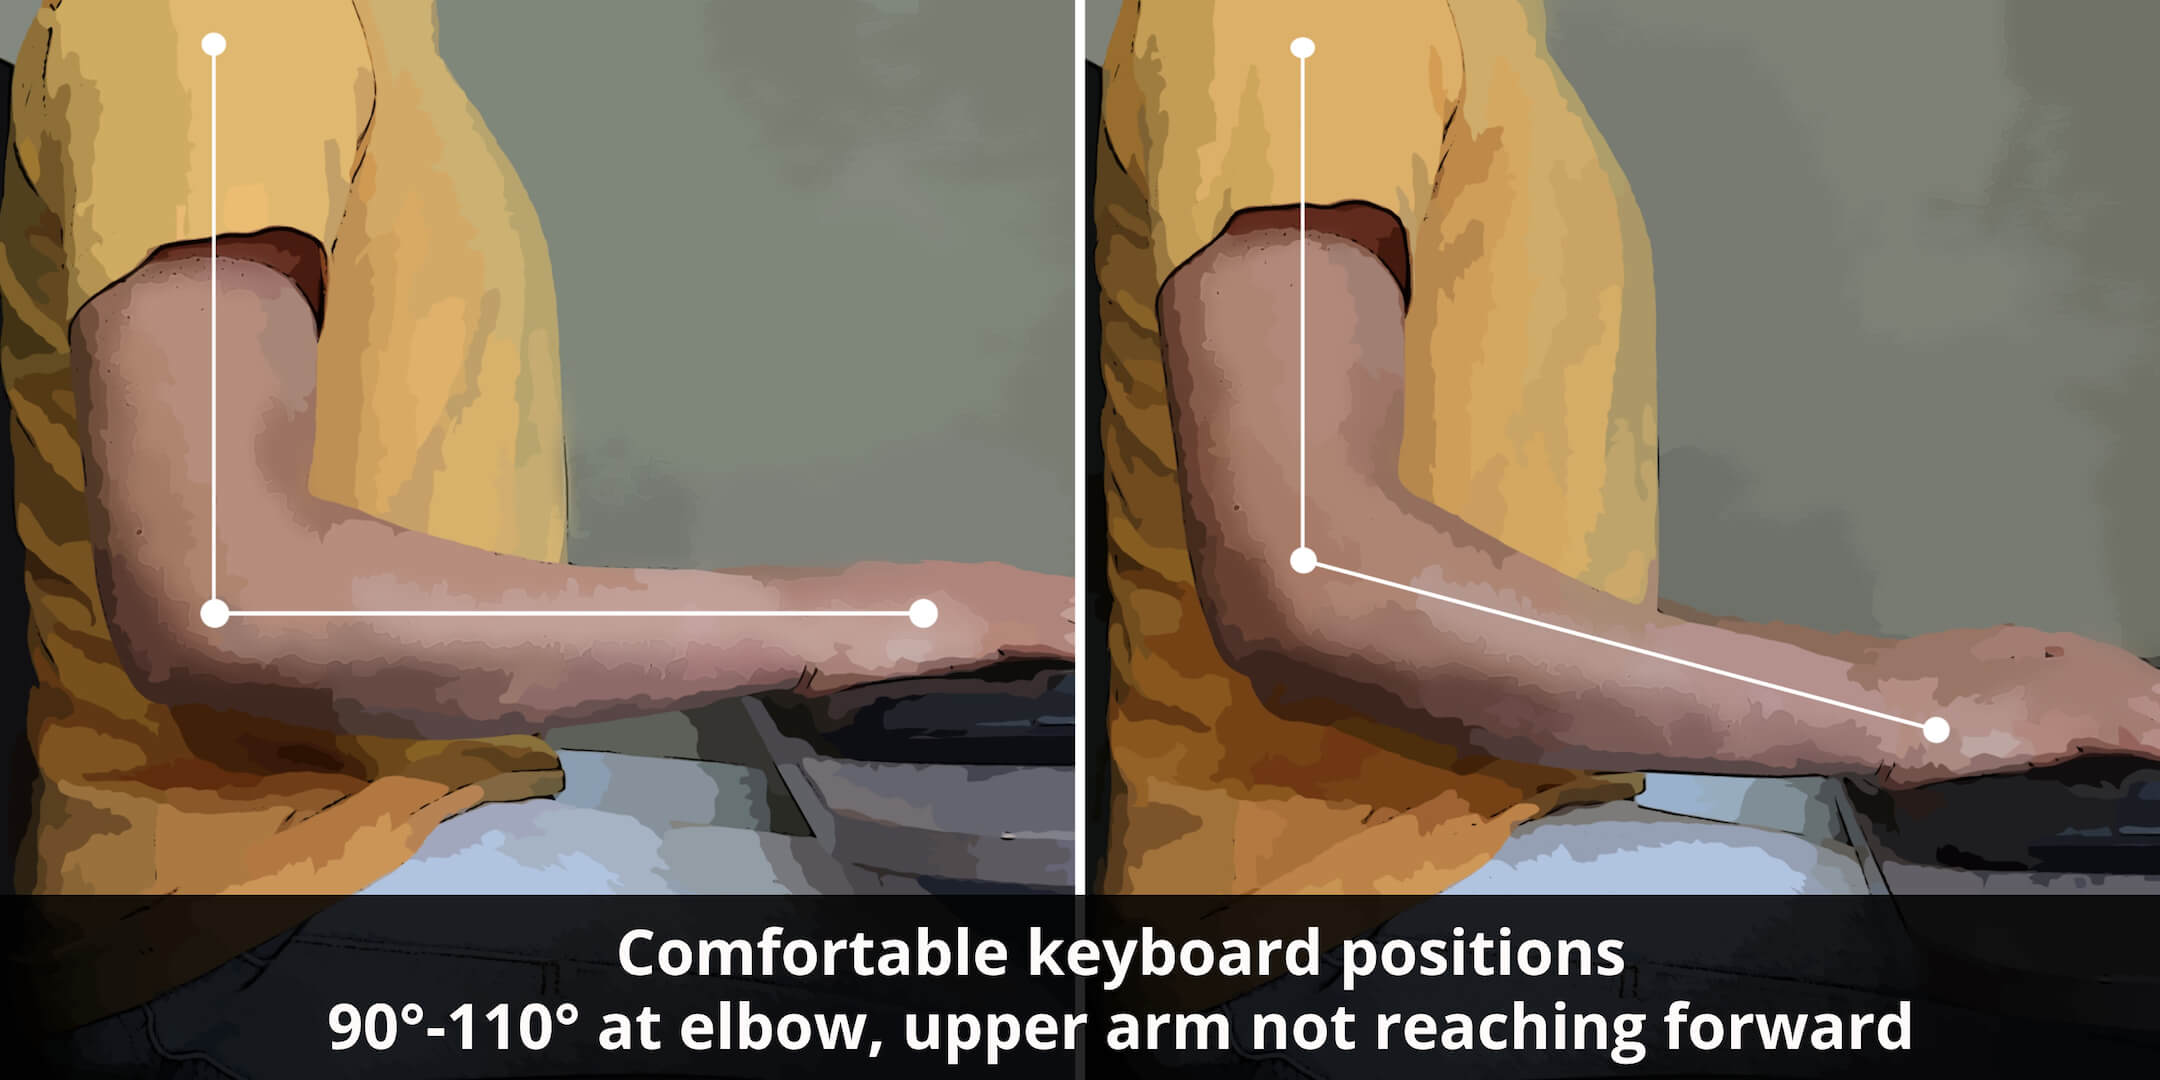
Our goal is to place the keyboard such that a right angle (around 90°-110°) is formed at the elbow between our upper and lower arms, while keeping the elbows close to our sides and not reaching out. Consequently, the keyboard would roughly be placed at elbow level. It’s okay if the keyboard is slightly lower than the elbow (roughly 110° at elbow) as this position can be quite comfortable for typing, as long as there is some gap between the table and your legs. But note that a 110° angle can also be achieved by reaching for the keyboard away from you, which is not recommended. Also avoid placing the keyboard higher than the elbow. If possible, support the palms on a soft surface (like a keyboard palm rest) and make sure that the lower arm is not pressed against sharp edges. Follow the same principles for the mouse and make sure it’s close to the keyboard to avoid reaching for it as well.
What if the table is too high or too low
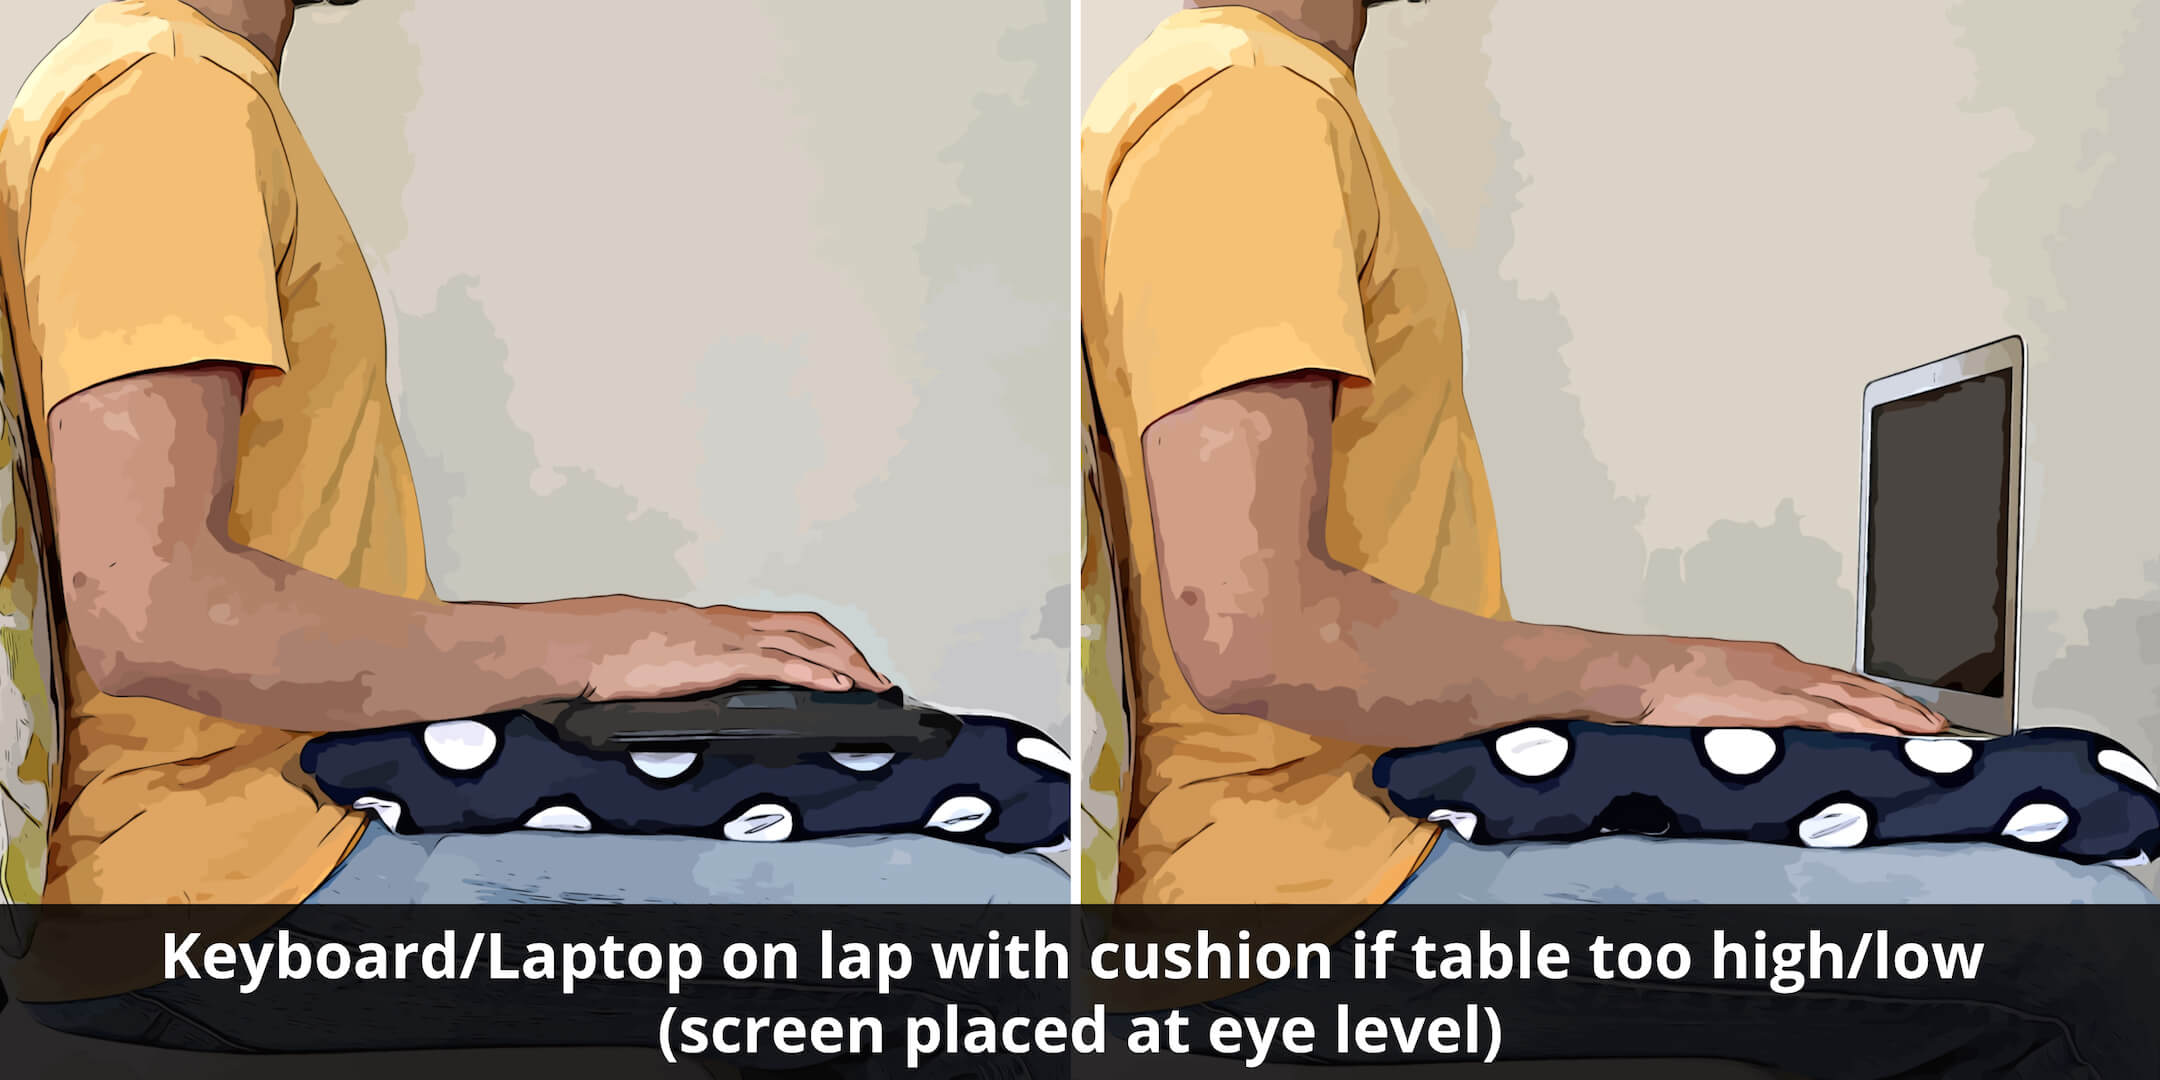
It is typical to place the keyboard and mouse on a table. However, it’s hard to do so and follow the above guidelines if the table is too high or too low for a given chair height. In these cases, I’ve found that it’s quite comfortable to place the keyboard on the lap and place a cushion under it if required. This position helps to keep the arms close to the sides and the keyboard level can be adjusted with the cushion thickness. I end up needing a very thin cushion but you can experiment with what works best for you.
This option works well especially if you are directly typing on your laptop (using a monitor as screen) as this also places the mouse i.e. trackpad at the right level. However, if you are using an external keyboard with the laptop placed higher at eye level, there’s no good option to place the mouse or reach the laptop trackpad. In this case an external mouse would have to be placed on the table which is at an improper height. This is okay if you don’t use the mouse frequently, like people who rely heavily on keyboard shortcuts. Otherwise, having to constantly reach the mouse at an uncomfortable distance is less than ideal. Here it might be worth investing in a basic table with a proper height or buy a keyboard which comes with an attached trackpad.
Putting it all together
All these steps are straightforward to follow individually. But making them all work together to get a good posture can sometimes feel like juggling multiple balls. In the past, I have often perfectly set up the screen and the foot support only to realize I need to redo everything when I think about keyboard placement. These kinds of issues can be easily solved by following a sequence based on the options you are working with.
If you choose to use a monitor, you can either directly type on your laptop or you can connect an external keyboard and mouse. However, if you do not have a monitor, you’ll definitely need to get an external keyboard and mouse (as explained here). In terms of investment, a keyboard/mouse can be cheaper than a monitor. It will also allow your setup to be portable to different locations in the house or for travel, unlike a monitor + laptop setup. On the other hand, buying a monitor can also be a good investment since it offers a bigger screen. It will allow you to type on the laptop and automatically bring the mouse i.e. trackpad at the same level as the keyboard. Of course you can always invest in a monitor, keyboard and a mouse.
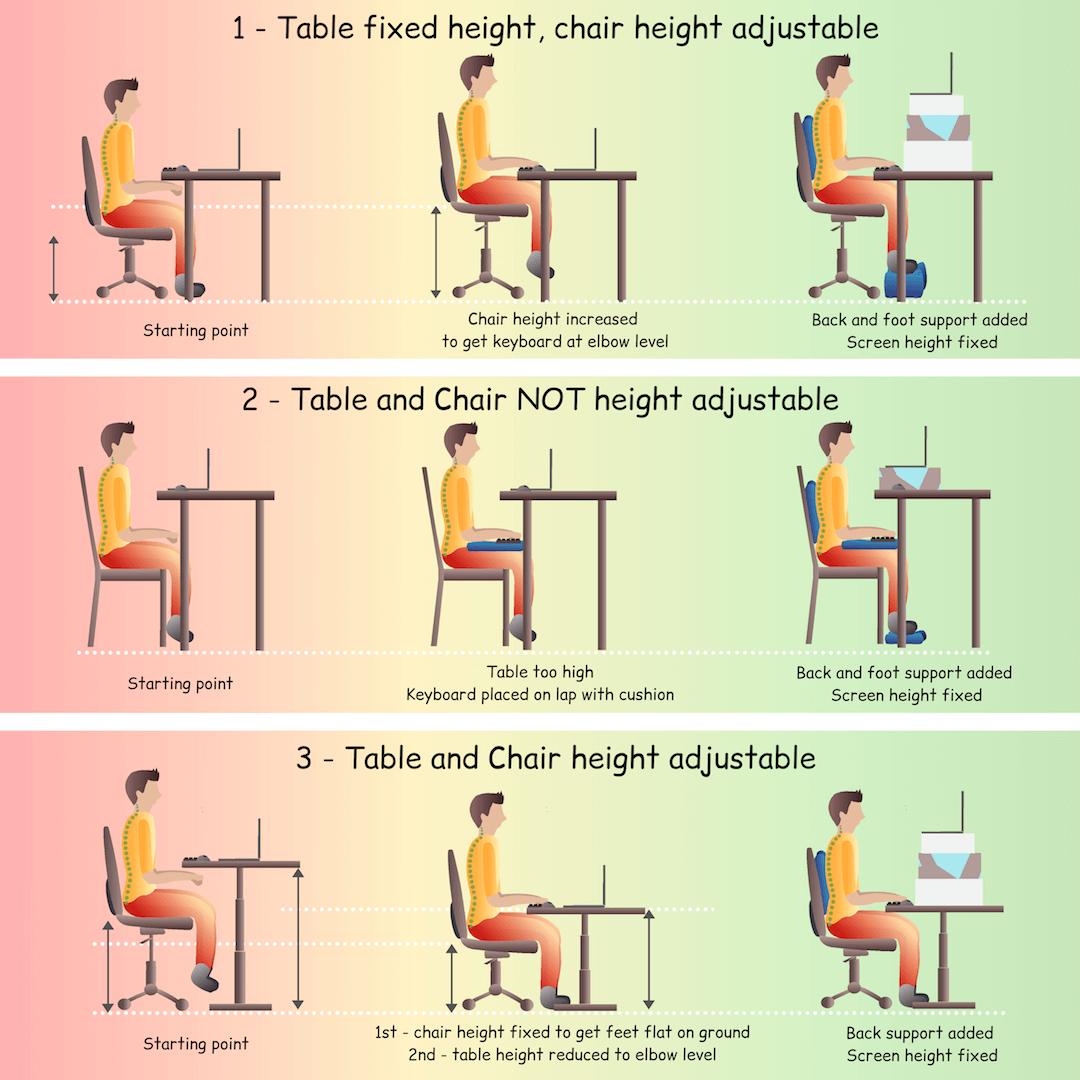
Here are some common configurations and the steps to follow:
Option 1: Table fixed height, chair height adjustable
- Place your keyboard/mouse (or laptop if using a monitor as screen) on the table and adjust the chair height such that the keyboard is at elbow level or a little lower based on your preference (see here). Make sure the keyboard is close so as to keep your elbows close to your sides.
- Consider option 2 with the keyboard on the lap if the table is too low or too high, even after adjusting chair height. Option 2 is also better if your arms need to reach for the keyboard because the chair can’t get close enough to the table (armrests, table drawers etc. getting in the way).
- Adjust foot support , back support and screen height as needed for the current chair height.
Option 2: Table and chair NOT height adjustable
- If the table is either low or too high for the chair, then place the keyboard (or laptop if using a monitor as screen) on your lap with a cushion under it (see here). Pick the cushion thickness based on the required keyboard position or skip it altogether if not needed. This also fixes the mouse i.e. trackpad position if you are directly typing on your laptop. But if you are using an external keyboard with the laptop placed higher at eye level, then place the mouse on the table. The mouse position won’t be ideal but it’s better than both keyboard and mouse being located uncomfortably on the table.
- Consider option 1 with the keyboard on the table if the table is already at the right height or just a little higher or lower than elbow level. If the table is a little high, increase the effective chair height by sitting on a firm cushion. If it’s a little low, you can leave it as is or make the keyboard match elbow level with a thin box under the keyboard.
- Adjust foot support , back support and screen height as needed for the current chair height.
Option 3: Table and chair height adjustable
- Fix the chair height so your feet lay flat on the ground.
- Place the keyboard and mouse (or laptop) on the table and adjust table height to elbow level.
- Consider option 1 if the table doesn’t go low enough to get the desired height.
- Adjust back support and screen height as needed.
This post is meant as a starting point and doesn’t cover ergonomic tools or details like arm support, screen fatigue, etc. All these suggestions are meant to be guidelines and not strict dogmas. Some of them may or may not work for you based on feasibility, personal preferences and muscle strength. Of course, new changes can feel a little uncomfortable at first. But let your body’s signals guide you in the right direction. Once you get a sense of what works for you using a minimal setup, you could consider investing in some basic equipment to make things a bit easier. I’ll be happy to share more details about how I gradually built my setup in upcoming posts.
You need that break!
It’s really important to point out that our bodies were never built to stay stationary all day. So even with the best ergonomic setup, we have to remember to get up at least every hour or sooner and move around a bit, even if it’s just to get some water. This is literally the most important step. There are plenty of ways to remind ourselves to do this. I’m sure our phone notifications can help us for once!
Final Note
“Success is a progressive realization of a worthy ideal”.
I personally love this definition of success. While we might aim for perfection, it helps to remember that we are succeeding each time we make an effort. Our postural muscles need time to improve to be able to hold a good posture for a longer time. So a realistic plan is to build these habits slowly and iteratively. The important part is to take action because when it comes to your spine health, prevention is ALWAYS better than cure. Based on my personal experience, it’s not a good idea to wait until your symptoms are screaming for help.
I hope this post could offer you a little help to get started. Hit the ❤️ button if it did, it would mean a lot! Please leave a comment if you have any questions or if you need some advice to fix your setup. I can absolutely help troubleshoot if required. Note that I’m not a qualified therapist or doctor. Just an engineer with years of experience dealing with back and neck problems, available to help out others facing these issues.
DISCLAIMER: This content is not medical advice and is intended for general education and demonstration purposes only. Don’t use this content to avoid going to your own healthcare professional or to replace the advice they give you.

Looks great!
Thanks to you for the illustrations!
Great work Sneha.
Will follow this while WFH and share with my friends.
Illustrations are awesome for visual learners like me👏👏
Thanks for sharing your knowledge at the right time Sneha, much needed and appreciated!!
Thank you Sachin 🙂
On this mother’s day
I am feeling very proud to say my daughter managed her back and neck issues most of the time
By herself.
Now she is ready to help others to gaurd their spine and prevent aches and pains.
Her story will enlighten all!
Best wishes.
Thank you mummy 🙂 Happy mother’s day!
Well written Sneha. I share your mom’ sentiments. You have set an example of how to take care of oneself. Keep sharing your learning points.
And the image work is excellent. Quite nifty!
Hope Yashodhan gets shooting bug!
Thank you so much 🙂 Yashodhan worked on the illustrations!
Hi Sneha,
This is really very very helpful. I realised after reading this how wrongly we sit and that causes so much trouble to our back and neck. I have already started trying the correct postures now and my back feels good. Specially, when all are working from home these small changes can help us avoid so many problems that may happen. Great work and keep it up. Will be waiting for new posts.
Very well explained Sneha ….if we follow this major back neck problems will be resolved 👍🏻
Thank you Snehal 🙂 Glad it was useful!
Very well described. Indeed useful. Thanks Sneha.
Thank you Sandeep 🙂
Very well written! Keep it up, looking forward to more articles like these 🙂
Thanks a lot Aniket!
Very well articulated thoughts Sneha! The illustrations are amazing too.. and very easy to bring them to practice!
Looking forward to more of such articles .. 🙂
Thanks for sharing your knowledge at the right time Sneha, much needed and appreciated!!
Blog on a very important topic which is an need of the hour.
Loved the way it is being presented,simple and easy to understand for a person with no medical background.
Thanks so much Nupur 🙂
Great stuff!! Very elaborate on what we can do with different options we have available at home. The detailed illustrations help register the content well and I am sure will help me immitate the positions when I try to improve my posture while working.
Thanks for taking the effort to put together all of this. Look forward to more!
Thank a lot Apurva! Looking forward to writing more as well 🙂
Wow.. This is so helpful for every individual nowadays. You have covered everything in detail and presented it in a simple easy way.
Very nice.
Keep going.
Thanks a lot Nikhil! Glad you found it helpful 🙂
Very informative and to the point! Looking forward to more articles! 🙂
Thanks a lot Omkar 🙂
Well presented and informative. I myself getting pulled more and more towards bad posture because of continuous WFH. This article works as an alarm and I started following with small steps.
Thanks for the effort you have put into sharing your experience and learning.
Thanks Renuka 🙂 So glad you’re able to start following some of these steps gradually!
Hi Sneha,
This is incredible piece of work! Very well structured and an intelligent blog. The way the blog and illustrations are designed to enable readers to understand key takeaways in just under 1 min, is incredible. Loved the 3 options. They contain all your knowledge, experiments and thinking you would have done over the years and leaves the readers with solutions they can simply implement. I hope this blog helps people as much as it helped me.
Thanks Kanishka! Your comment really means a lot to me 🙂
Hi Dear Sneha,
Great efforts on this so ignored and much suffered subject by so many people who work on computers. Its really worth reading your blog and following the solutions shared by your own experience.
Thanks a lot Mayur 🙂
Omg! This is so useful!!! And perfect for this time , now that we are working from home! I absolutely loved it and it’s super useful!!! Definitely worth sharing! Thank you so much!!!